After much thought and deliberation I have opted to change the name of Mountain Goddess Studio to Whimsy Forest.
I will continue the blog on that website. Please come follow me over there. A forest is a much bigger and nicer place for the critters and the fairies. :)
Friday, March 18, 2016
Friday, January 15, 2016
Why No Discounts

Now that the holidays are behind us for a while, I want to talk about something all businesses at all levels have to deal with. Specifically, the idea that discounts, sales and slashing prices are required to move product. There was Black Friday, Small Business Saturday, and Cyber Monday immediately after Thanksgiving. As December rolled out, there were more and more notices in my e-mail box and my regular mail box stating that for a limited time this or that was on sale. This is great for the consumer to get a deal. Honestly, I'm delighted when something I want to buy happens to be on sale. But, think about it, would you have bought that particular item sooner if the sale price were the regular price? Or would you have bought the item at all if it wasn't on sale? If you wouldn't buy it at the regular price, why would you buy it when it was at a sale price?
Because I am behind the scenes running my small business, I know exactly what goes into each of my creations. There are materials to buy. I have to cover utilities and keep a roof over my head. I have to eat. My time is worth something. Each of these has to be factored into pricing a product. Now, for a big manufacturing outfit, there are materials, utilities, buildings and wages to employees. As a person working by and for myself, I don't have to pay wages to anyone else but me. :)
Ok, we've got all these expenses, now what? Well, you've got to figure out how much profit to add as well. Profit isn't the money used to pay wages or utilities. That's the money that is invested back into the business to fund researching and developing new ideas so you can make new products that people will love.
All these things add up to a price for each product. Once you have figured that out, ta-da, there is the price. Now, this will have to be adjusted as material costs go up or utility costs go up or any other expenses go up. The price might increase because postage goes up (as it will in the US in a couple of days). Since I have to order my materials from online vendors, that price has to be part of the cost of making my toys. The costs of making something usually don't go down unless you can figure out how to automate something. A big manufacturer may find a way to be more efficient by buying a machine that does one or more steps. But, even then, the machine costs money to buy or even build as a custom one. And, that machine has to be maintained. So while it may seem to save money and it most likely will, it has to be paid for somehow.
I have worked out all the numbers and have come up with a price, which is what I list for each toy in my Etsy store. If I put that on sale and lower the price, the question is, why can't I charge that lower price all the time? The answer is, I can't. I would end up losing when I lower the price below what I originally asked for. I will end up losing the money I use to create new products. If the number goes low enough for a deep discount, I'm giving away my time for free. A huge enough discount and essentially, I'm paying you to buy my product. A business cannot succeed like that.
Of course one option is to raise the prices even higher. That way if I do offer something on sale, I'm not losing anything. I'm still making my expenses, paying for my time and getting a profit. However, that seems dishonest to me. I work at being an honest person. Deep in my soul it feels wrong to inflate my prices just so I can put them on sale now and again. My solution is to put an fair price on my toys when I put them in my shop. I don't offer sales, or incentives, or discounts. If this causes someone to not buy my item, then so be it.
I have been approached many times by people wanting a discount, especially if they want to buy multiple items. I don't have a lot of wiggle room in my price. Whether I make one toy or 10 toys, each toy of a type takes the same amount of time and materials to make. These toys are hand made by me one at a time, not factory made by the hundreds. If someone wants to buy 2 dragons, it takes me the amount of time and materials to make the dragon two times. I don't work any faster when I make 2 of them.
The only time I can see putting my toys "on SALE" is if I have decided that I no longer will make that toy for sale and I'm getting rid of the stock to make room for something new. Or, I am no longer able to make toys at all and will be shutting the business down. I don't see either of those things happening any time soon.
I love making my toys. I had a marvelous time in 2015 exploring how to make a cloth fairy doll. I have many more ideas up my sleeve for new products and will continue to sew and design and sew some more bringing you toys that are as non-toxic as I can make them at a fair price.
Wednesday, September 23, 2015
A fairy doll
Way back in January, I began working on designing a cloth doll. I didn't want just any cloth doll. I wanted a fairy doll. One that would be in the same world as my critters. Not only that, I wanted a fairy doll to be an actual fairy with wings quite firmly attached. None of this wings attached to the clothing or wings like a Halloween costume.
I began with a basic Waldorf type doll based on a book I'd purchased. I liked the concept of cotton skin and wool stuffing. I have kept that part in my doll making. I found that making the head wasn't easy. I have an easier solution which I will share in another blog post. When I was done with the doll, I realized that it was not what I wanted. Little tiny dots for eyes spread too far apart and another little bit for a mouth. I understand the philosophy and reasoning behind this. But, it didn't ring true for me. I also wasn't happy with the mitten hands and club feet.
I began to think of what I would want in a doll. I started by experimenting with the facial features. I added a bump for a button nose, pulled the eyes closer together and made them bigger, and made a longer mouth. My embroidery skills are great, but I could not embroider bigger eyes on the knit fabric. I've got many, many eyes on heads sitting in a box, along with other body parts. :) I decided to go with something I had tried years ago when I couldn't afford to buy plastic safety eyes for a stuffed bunny I was making. I created eyes out of felt and embroidered them in place. It gave the doll that innocent wide eyed look I wanted. Then I added the delicate pointed ears. That made me happy.
Addressing the arm attachment and lack of fingers was the next step. I made several attempts and have arms sitting in that box along with the heads. It isn't perfect. I wish the hands and fingers were just exactly as I envisioned them. Alas, the fabric will only allow so much because it's a stretchy knit. But, the doll has fingers. That makes me happy too.
The leg and especially the foot came to be even more challenging than the fingers. More body parts got added to the box as I worked out just how the leg and foot should be made. As I worked through each step in the process, I became certain I was done, only to find out that there was another issue to be addressed to see my vision into reality.
There was the slight curvature to the back and darts at the hips to make a nice curved bottom. The hair was yet another issue. Some of the more complete dolls in the box of parts have interesting heads of hair. And I'm still not entirely pleased with how the hair has come out. I will continue to work on that.
I thought that the last issue would be designing and attaching the wings. I was wrong. The wings were a challenge, but not the last one. Actually, designing the wing itself was fairly straightforward. It was attaching them to the doll that was the challenge. And they are not exactly what I had in mind because the wings can be removed from the doll. However, sewing the wings directly to the doll, they did not lay correctly across the back. The snaps work well and keep the wings attached to the doll.
The final issue, which I didn't think would be hard at all, was clothing the doll. The upper part of the clothing has to be able to fit around the wings. I thought that would be easy. It's just doll clothes with an opening in the back to accommodate the wings. HA! It also took time to figure out.
At last, months later, it has all come together. While there are dolls that came before her, she is the culmination of all those months of work. I give you Nerine, the fairy doll in pink.
She is available in my Etsy store now and waiting to find a new home that needs a bit of fairy magic. There will be other fairy dolls in the near future.
I began with a basic Waldorf type doll based on a book I'd purchased. I liked the concept of cotton skin and wool stuffing. I have kept that part in my doll making. I found that making the head wasn't easy. I have an easier solution which I will share in another blog post. When I was done with the doll, I realized that it was not what I wanted. Little tiny dots for eyes spread too far apart and another little bit for a mouth. I understand the philosophy and reasoning behind this. But, it didn't ring true for me. I also wasn't happy with the mitten hands and club feet.
I began to think of what I would want in a doll. I started by experimenting with the facial features. I added a bump for a button nose, pulled the eyes closer together and made them bigger, and made a longer mouth. My embroidery skills are great, but I could not embroider bigger eyes on the knit fabric. I've got many, many eyes on heads sitting in a box, along with other body parts. :) I decided to go with something I had tried years ago when I couldn't afford to buy plastic safety eyes for a stuffed bunny I was making. I created eyes out of felt and embroidered them in place. It gave the doll that innocent wide eyed look I wanted. Then I added the delicate pointed ears. That made me happy.Addressing the arm attachment and lack of fingers was the next step. I made several attempts and have arms sitting in that box along with the heads. It isn't perfect. I wish the hands and fingers were just exactly as I envisioned them. Alas, the fabric will only allow so much because it's a stretchy knit. But, the doll has fingers. That makes me happy too.
The leg and especially the foot came to be even more challenging than the fingers. More body parts got added to the box as I worked out just how the leg and foot should be made. As I worked through each step in the process, I became certain I was done, only to find out that there was another issue to be addressed to see my vision into reality.
There was the slight curvature to the back and darts at the hips to make a nice curved bottom. The hair was yet another issue. Some of the more complete dolls in the box of parts have interesting heads of hair. And I'm still not entirely pleased with how the hair has come out. I will continue to work on that.
I thought that the last issue would be designing and attaching the wings. I was wrong. The wings were a challenge, but not the last one. Actually, designing the wing itself was fairly straightforward. It was attaching them to the doll that was the challenge. And they are not exactly what I had in mind because the wings can be removed from the doll. However, sewing the wings directly to the doll, they did not lay correctly across the back. The snaps work well and keep the wings attached to the doll.
The final issue, which I didn't think would be hard at all, was clothing the doll. The upper part of the clothing has to be able to fit around the wings. I thought that would be easy. It's just doll clothes with an opening in the back to accommodate the wings. HA! It also took time to figure out.At last, months later, it has all come together. While there are dolls that came before her, she is the culmination of all those months of work. I give you Nerine, the fairy doll in pink.
She is available in my Etsy store now and waiting to find a new home that needs a bit of fairy magic. There will be other fairy dolls in the near future.
Friday, August 7, 2015
Fiber Art Legacy
This is my grandmother on her 100th birthday. She lived to be 104 years old. But she, like my other grandmother and my mom, knew how to use fabric and yarn to make things. She sewed and crocheted. Her favorite was to crochet baby sweaters, hats and booties.
I was thinking about my sewing legacy. My mom sews and quilts. She dabbles in crochet and knitting. She taught me to sew when I was very young. I learned to thread a needle and make stitches at about 6 years old. They weren't the best stitching, but it was a start. I began to learn to use a sewing machine about 7 or 8 years old.
My other grandmother didn't live as long, but she too, knew how to sew. She also knew how to quilt, crochet and tat. Looking back I wish I had asked her to teach me how to tat. My mom shared with me that grandma could figure out how to sew garments without using a commercial pattern.
I'm certain my great grandmothers, through necessity, knew how to at least do some basic sewing. Tho' I suspect they knew more. I am the product of all these women. I was amazed as I stepped into the adult world years and years ago, that my ability to sew and mend (which I took for granted) was not shared by my peers. If I showed up to work in a new blouse, the question of, "Where did you get it?" was answered with, "I made it." and the conversation died. I suppose sewing and other fiber arts are fading away. There was no curiosity. It was chalked up to me being a little weird or maybe they didn't believe me.
When my son was young, I made most of his Halloween costumes. I'd even make him the occasional piece of clothing. I remember one such incident when fleece jackets were in style. I couldn't afford to spend the money on one of these specialty items. I took him to the fabric store where the fleece was on sale. He picked the fabric and the style of jacket. I was able to purchase it for 1/4 the price of the finished goods available in the stores. Once made, he wore it to school. He was asked where he'd gotten it and proudly claimed that I had made it for him. He was accused of lying even tho' one bold youngster pulled the back of the jacket to check for a label and discovered there wasn't one. I was saddened that the kids couldn't even comprehend that someone knew how to sew.
I have always taken this skill for granted. It is so much a part of me that I give it no thought. It's something I know how to do. Missing a button, let me look in the buttons I have and replace it. Zipper's broken, I can get a new one and sew it in. A rip, tear, or hole in the pants, a little stitching and it's mended. If a skirt or pants are too long, I can hem them shorter. I just do these things without thinking about how I came to have the skills. The skills have expanded beyond clothing. I have made costumes, bags, toys, pillows, and curtains. I have gotten to the point of designing the patterns I follow rather than buying one, especially for the stuffed toys.
Sewing is my inheritance from the women in my family. I want to thank each of them for their part. And, even tho' I threw temper tantrums at the sewing machine while learning, I am honored to be part of that tradition.
I was thinking about my sewing legacy. My mom sews and quilts. She dabbles in crochet and knitting. She taught me to sew when I was very young. I learned to thread a needle and make stitches at about 6 years old. They weren't the best stitching, but it was a start. I began to learn to use a sewing machine about 7 or 8 years old.
My other grandmother didn't live as long, but she too, knew how to sew. She also knew how to quilt, crochet and tat. Looking back I wish I had asked her to teach me how to tat. My mom shared with me that grandma could figure out how to sew garments without using a commercial pattern.
I'm certain my great grandmothers, through necessity, knew how to at least do some basic sewing. Tho' I suspect they knew more. I am the product of all these women. I was amazed as I stepped into the adult world years and years ago, that my ability to sew and mend (which I took for granted) was not shared by my peers. If I showed up to work in a new blouse, the question of, "Where did you get it?" was answered with, "I made it." and the conversation died. I suppose sewing and other fiber arts are fading away. There was no curiosity. It was chalked up to me being a little weird or maybe they didn't believe me.
When my son was young, I made most of his Halloween costumes. I'd even make him the occasional piece of clothing. I remember one such incident when fleece jackets were in style. I couldn't afford to spend the money on one of these specialty items. I took him to the fabric store where the fleece was on sale. He picked the fabric and the style of jacket. I was able to purchase it for 1/4 the price of the finished goods available in the stores. Once made, he wore it to school. He was asked where he'd gotten it and proudly claimed that I had made it for him. He was accused of lying even tho' one bold youngster pulled the back of the jacket to check for a label and discovered there wasn't one. I was saddened that the kids couldn't even comprehend that someone knew how to sew.
I have always taken this skill for granted. It is so much a part of me that I give it no thought. It's something I know how to do. Missing a button, let me look in the buttons I have and replace it. Zipper's broken, I can get a new one and sew it in. A rip, tear, or hole in the pants, a little stitching and it's mended. If a skirt or pants are too long, I can hem them shorter. I just do these things without thinking about how I came to have the skills. The skills have expanded beyond clothing. I have made costumes, bags, toys, pillows, and curtains. I have gotten to the point of designing the patterns I follow rather than buying one, especially for the stuffed toys.
Sewing is my inheritance from the women in my family. I want to thank each of them for their part. And, even tho' I threw temper tantrums at the sewing machine while learning, I am honored to be part of that tradition.
Sunday, January 25, 2015
The Care and Feeding of Dragons
If you are one of the people in the world who has purchased a dragon from my Etsy store, or in person at a market, thank you. I thought you might like to know how to clean the little critter if it gets dirty. The wool felt is somewhat soil resistant, so cleaning it is not done very often.
Your dragon is a special
creature from the magical realm on the Mountain. He or she is used to
gentle play. The head, neck, legs and tail do not move on your dragon
and should not be forced. To move these parts will hurt the dragon
and may lead to injury. While the wings do have some movement
ability, it should be done in a gentle manner.
If your dragon gets
dirty, please do not give it a full bath without attempting one of
these methods first.
- Create some soap foam using a gentle dish soap. Carefully use the bubbles on a soft cloth to rub gently on the area of dirt. Then take a clean damp cloth to rub away the soap residue.
- If that fails to clean your dragon, next try to use the cool, soapy (again gentle dish soap) water with a cotton bud (Q-tip) to rub the area of dirt. Again use a clean damp cloth to rub away the soap residue.
If your
dragon is so dirty that these methods fail, you can dip the dragon in
a cool water and gentle soap solution gently scrubbing at the worst
dirt. Rinse in clean cool water. Blot as much water as you can with a
clean towel. Set
the dragon on a clean paper towel or cloth. At this point the dragon
needs some alone time to air dry for two to three days.
Note
that rubbing the felt may cause some of the fibers to roll up so do
the least amount of rubbing to avoid a rough patch.
Finally,
please do not
feed your dragon. It is already stuffed. :)
Friday, February 28, 2014
Evolution of a T-Rex
Several months ago, I decided that it would be great to add dinosaurs to my line up of toys. While not strictly fantasy, they are not something you see every day since they are now extinct. My first attempt at making a dinosaur could be said to be the Nessie toy since I based it loosely on a Plesiosaur. The next one I worked on was the ever popular Tyrannosaurus Rex.
I spent some time looking at artist's renditions of the dinosaur. I looked at pictures of museum models and museum displays of skeletons. The T-Rex actually, according to the latest findings, keeps it's body balanced in an almost horizontal position rather than the almost upright position depicted in cartoons and even some plastic models.
With the position in mind and with the limitations of the felt, I attempted to create a simplistic T-Rex with a horizontal body. The first rendition was an epic fail. I didn't even finish stuffing it. Poor thing looks like road kill rather than a dinosaur at all. (bottom figure in the picture to the right)
Round two showed flaws in my ability to balance a toy on two legs as it promptly fell on its nose. (middle figure in the picture to the right) In the interest of keeping it balanced on the hind legs alone, I changed the body from horizontal to an even more upright, if not correct stance. This time, I filled the tail with salt. (top figure in the picture to the right) Now, I know that salt in the tail is not a good solution. I was looking for something to weight the tail. Even with the salt, it looks like it's about to fall over. These have been relegated to the reject box.

At this point, I came to the conclusion that a properly balanced T-Rex wasn't going to happen at only 4 or 5 inches tall and made out of felt. I took artistic license and redrew the pattern entirely, having the T-Rex in a seated position. And since T-Rex is all about the huge mouth full of teeth, I added them in felt. They are obviously too large. And seated, the tail is too long. (see picture to the left)

Back to the drawing board. This time, it was, I thought fairly easy to just shorten the tail. At this point I was out of the lovely green felt so switched to an orange one to continue the experiments. After I made this one up, I realized that when I shortened the tail I had the T-Rex balanced on it's heels and the tip of the tail. Not what I was looking for. And back to the pattern again to make adjustments to the T-Rex was actually seated, not hovering. (see picture to the right in orange)

I made one more version. The last 2 versions also ended up in the reject box. This time I got the version that I have made up for sale. (Soon to be in the Etsy shop) I got it seated and I got the teeth looking ok and not like having over-sized dentures. While I am disappointed I wasn't able to create a realistic pose. I am pleased with the final result.
Until next time...
I spent some time looking at artist's renditions of the dinosaur. I looked at pictures of museum models and museum displays of skeletons. The T-Rex actually, according to the latest findings, keeps it's body balanced in an almost horizontal position rather than the almost upright position depicted in cartoons and even some plastic models.
With the position in mind and with the limitations of the felt, I attempted to create a simplistic T-Rex with a horizontal body. The first rendition was an epic fail. I didn't even finish stuffing it. Poor thing looks like road kill rather than a dinosaur at all. (bottom figure in the picture to the right)Round two showed flaws in my ability to balance a toy on two legs as it promptly fell on its nose. (middle figure in the picture to the right) In the interest of keeping it balanced on the hind legs alone, I changed the body from horizontal to an even more upright, if not correct stance. This time, I filled the tail with salt. (top figure in the picture to the right) Now, I know that salt in the tail is not a good solution. I was looking for something to weight the tail. Even with the salt, it looks like it's about to fall over. These have been relegated to the reject box.

At this point, I came to the conclusion that a properly balanced T-Rex wasn't going to happen at only 4 or 5 inches tall and made out of felt. I took artistic license and redrew the pattern entirely, having the T-Rex in a seated position. And since T-Rex is all about the huge mouth full of teeth, I added them in felt. They are obviously too large. And seated, the tail is too long. (see picture to the left)

Back to the drawing board. This time, it was, I thought fairly easy to just shorten the tail. At this point I was out of the lovely green felt so switched to an orange one to continue the experiments. After I made this one up, I realized that when I shortened the tail I had the T-Rex balanced on it's heels and the tip of the tail. Not what I was looking for. And back to the pattern again to make adjustments to the T-Rex was actually seated, not hovering. (see picture to the right in orange)

I made one more version. The last 2 versions also ended up in the reject box. This time I got the version that I have made up for sale. (Soon to be in the Etsy shop) I got it seated and I got the teeth looking ok and not like having over-sized dentures. While I am disappointed I wasn't able to create a realistic pose. I am pleased with the final result.
Until next time...
Monday, January 6, 2014
Slow Toys
I know it's been a while. November and December were rather full for me as I recovered from the arm injury and had to catch up. I was making candy and toys for local craft shows and my Etsy shop. There was also, of course, getting gifts off to family.
I would like to thank all of you who have stopped by my little corner of blog land and read my blog posts. I also want to thank everyone who stopped by my Etsy store to take a peek. I was very pleased with the number of views, favorites, and yes, purchases. :) I hope you will all stop by again to see what's new throughout 2014.
While at the Christmas Craft show in town the first Saturday in December, I noticed a marked aversion to my toys. My candy, herb mixes and smoked salts were selling just fine. But, while the toys made people smile, they also dragged the children away from the display. I started asking myself what was wrong.
I went to the customer's side of the table. My signs were intact and properly displayed. The toys were hanging out in the castle. Nope, nothing wrong there. Then I started listening, over the general noise, to what was being said as the children were dragged away, or a couple of ladies left the table. "Those are way too expensive!" was common. As was, "It would be too much at half that price." And often, specifically to the children who asked for one, "I can't afford that much for a toy for you, maybe Santa will bring you one." To which any child over the age of about 6 looked disappointed, knowing they would not be receiving that toy.
After I decompressed from the holidays, I thought about this. On the one hand, my toys were selling from my Etsy shop. On the other, at the local craft show, people saw the price as being too high. (I priced the toys identically.) Now, people would comment to my face, how adorable, precious, and cute the toys were. They admired the fine craftsmanship in the construction, and remarked how I must have good eyesight. These people could actually see, and hold the toys. Yet, my toys were too expensive for them to buy. Is the local economy that bad? Or perhaps this is also the common reaction from the people who do not purchase my toys online as well? In which case, I may have a problem. Or maybe not.
My little critters are made with care and attention to the tiny details that make them adorable and cute. I hand stitch each one individually. I am not a factory, nor do I run one. One might say that these toys are part of the Slow Movement. The books, blogs, and half hour TV shows claiming you can make this or that really quick and easy has impacted those of us who know better. Art and craft take time. Hand made takes time. My time counts for most of the cost of one of my toys. While the 100% wool felt and wool batting isn't something you can buy at the local hobby store, it's available. It also costs more than the craft felt and polyester type stuffing. On the other hand, the cotton embroidery floss with which I stitch each one is available many places. I guess what I'm trying to say is that a natural toy (made with natural fibers) made by hand is vastly different than a plastic toy made in a factory. Which would you rather give to a child? Or which would you like for yourself?
Should I be worried that my prices are too high? I don't think so. In fact, I am probably not charging enough for the time I put into each one. But, for now, I'm happy that I've set a good price for each critter. I think it would be marvelous if just like Slow Food, Slow Art, and Slow Fiber, we could have Slow Toys. I'd fit right in. :)
Until next time...
I would like to thank all of you who have stopped by my little corner of blog land and read my blog posts. I also want to thank everyone who stopped by my Etsy store to take a peek. I was very pleased with the number of views, favorites, and yes, purchases. :) I hope you will all stop by again to see what's new throughout 2014.
While at the Christmas Craft show in town the first Saturday in December, I noticed a marked aversion to my toys. My candy, herb mixes and smoked salts were selling just fine. But, while the toys made people smile, they also dragged the children away from the display. I started asking myself what was wrong.
I went to the customer's side of the table. My signs were intact and properly displayed. The toys were hanging out in the castle. Nope, nothing wrong there. Then I started listening, over the general noise, to what was being said as the children were dragged away, or a couple of ladies left the table. "Those are way too expensive!" was common. As was, "It would be too much at half that price." And often, specifically to the children who asked for one, "I can't afford that much for a toy for you, maybe Santa will bring you one." To which any child over the age of about 6 looked disappointed, knowing they would not be receiving that toy.
After I decompressed from the holidays, I thought about this. On the one hand, my toys were selling from my Etsy shop. On the other, at the local craft show, people saw the price as being too high. (I priced the toys identically.) Now, people would comment to my face, how adorable, precious, and cute the toys were. They admired the fine craftsmanship in the construction, and remarked how I must have good eyesight. These people could actually see, and hold the toys. Yet, my toys were too expensive for them to buy. Is the local economy that bad? Or perhaps this is also the common reaction from the people who do not purchase my toys online as well? In which case, I may have a problem. Or maybe not.
My little critters are made with care and attention to the tiny details that make them adorable and cute. I hand stitch each one individually. I am not a factory, nor do I run one. One might say that these toys are part of the Slow Movement. The books, blogs, and half hour TV shows claiming you can make this or that really quick and easy has impacted those of us who know better. Art and craft take time. Hand made takes time. My time counts for most of the cost of one of my toys. While the 100% wool felt and wool batting isn't something you can buy at the local hobby store, it's available. It also costs more than the craft felt and polyester type stuffing. On the other hand, the cotton embroidery floss with which I stitch each one is available many places. I guess what I'm trying to say is that a natural toy (made with natural fibers) made by hand is vastly different than a plastic toy made in a factory. Which would you rather give to a child? Or which would you like for yourself?Should I be worried that my prices are too high? I don't think so. In fact, I am probably not charging enough for the time I put into each one. But, for now, I'm happy that I've set a good price for each critter. I think it would be marvelous if just like Slow Food, Slow Art, and Slow Fiber, we could have Slow Toys. I'd fit right in. :)
Until next time...
Saturday, November 2, 2013
Something different - Books
As I stated in my last post (a month ago) I have been dealing with an injury that keeps me from sewing my little critters. I was thinking I shouldn't wait so long before posting again.
Besides sewing up dragons, and other fantasy critters or attempting to make dolls, I have a few other things I do. One of them is book making. I'm fairly new at this (a little over a year) and the pictures I'm showing are some of my practice books.
I keep a daily written journal. Being able to make the books I write in has been a thrilling experience. I am delighted to be able to write in books that I created. I would like to learn a lot more about book making.
Right now, I'm making books using things I have. For instance using a telephone book instead of a punching cradle. I sew the pages without a sewing frame. And instead of a book press, I use hubby's weight plates and/or heavy books. :) I have invested in a few supplies, 80lb drawing paper, book board, linen thread, decorative papers, and mull. I'd like to eventually get "proper" tools and equipment as well as learning more.
In the meantime, I'm still healing up. It's slow and even though I probably shouldn't be, I've been sewing critters for a little bit every day. So, soon, there will be another photo shoot and more listings will appear in my Etsy store.
Until next time...
Besides sewing up dragons, and other fantasy critters or attempting to make dolls, I have a few other things I do. One of them is book making. I'm fairly new at this (a little over a year) and the pictures I'm showing are some of my practice books.
I keep a daily written journal. Being able to make the books I write in has been a thrilling experience. I am delighted to be able to write in books that I created. I would like to learn a lot more about book making.
Right now, I'm making books using things I have. For instance using a telephone book instead of a punching cradle. I sew the pages without a sewing frame. And instead of a book press, I use hubby's weight plates and/or heavy books. :) I have invested in a few supplies, 80lb drawing paper, book board, linen thread, decorative papers, and mull. I'd like to eventually get "proper" tools and equipment as well as learning more.
In the meantime, I'm still healing up. It's slow and even though I probably shouldn't be, I've been sewing critters for a little bit every day. So, soon, there will be another photo shoot and more listings will appear in my Etsy store.Until next time...
Friday, October 4, 2013
Where are all the dragons?
I think there must be a dragon shortage in the world. The reason I say that is my little dragons are flying away to new homes all the time. It's great. I love that these little critters are finding new homes. It means I get to make more of them. :)
I will be uploading a crop of new dragons to the Etsy store later today, including Chocolate pictured here to the right. There are also a couple of unicorns.
Unfortunately, I have pulled a muscle in my left arm. It's been very painful for the last couple of weeks with no quick healing in sight. I got hubby to help me photograph the new critters I had sewn up previous to the injury. But no new critters have been made since then. I feel bad about that since it's obvious the world needs more dragons. I'm working on healing up and getting back to the studio as soon as I can.
Until next time...
I will be uploading a crop of new dragons to the Etsy store later today, including Chocolate pictured here to the right. There are also a couple of unicorns.
Unfortunately, I have pulled a muscle in my left arm. It's been very painful for the last couple of weeks with no quick healing in sight. I got hubby to help me photograph the new critters I had sewn up previous to the injury. But no new critters have been made since then. I feel bad about that since it's obvious the world needs more dragons. I'm working on healing up and getting back to the studio as soon as I can.
Until next time...
Friday, September 6, 2013
Dragon experiment
The feedback on this design is wonderful. I've succeeded in creating something different, but still done in my style. The negative comments one and all were that I should choose a better color combination. No one liked the black and orange dragon. :( I even had a name picked out for him, Spooky. Ah well, not everyone likes what I do and not everyone likes the colors I choose. If you have an opinion please leave me a comment below. I'm still deciding on whether to take this new design forward and offer this style of dragon for sale in my Etsy shop.
While I think about it, I'm working on a few unicorns.
Until next time...
Saturday, August 24, 2013
A different breed of dragon
After making the larger dragon, I was attempting to figure out a way to include more detail. One of my thoughts was to make the legs as separate parts, allowing the underbelly to be a different color.
I began with my miniature (4 inches tall) dragon pattern and made some changes. In addition, I liked the look of the gusset I used on the head of the large dragon and created that for this smaller size.
What you are seeing is the result of that experimental pattern. It's a lot more work than the original. Each leg has to be sewn separately and attached to the body. I chose to sew the legs first, then the belly gusset. Sewing the belly gusset became difficult working around the sewn on legs. If I continue this type of dragon, I'll experiment with sewing the legs on after the sewing the gusset.
However, I think this may have potential. It's currently residing with the large dragon on a shelf while I think about it.
Until next time...
I began with my miniature (4 inches tall) dragon pattern and made some changes. In addition, I liked the look of the gusset I used on the head of the large dragon and created that for this smaller size.
What you are seeing is the result of that experimental pattern. It's a lot more work than the original. Each leg has to be sewn separately and attached to the body. I chose to sew the legs first, then the belly gusset. Sewing the belly gusset became difficult working around the sewn on legs. If I continue this type of dragon, I'll experiment with sewing the legs on after the sewing the gusset.However, I think this may have potential. It's currently residing with the large dragon on a shelf while I think about it.
Until next time...
Friday, August 16, 2013
Larger isn't better
The last couple of weeks I've been getting feedback from family members concerning my small felt stuffed animals. The feedback was that the 4 inch (100mm) critters were too small. So, I took the dragon pattern and enlarged it.
The first problem I ran across was that the wings with 2 layers of felt at the small size, did not translate well to the larger size. The wings weren't stiff enough to stand up. I cut out 3 layers of felt for each wing. The wing is better. It's certainly stiffer. However, the wings are too heavy for the rest of the dragon.
The picture to the left shows the comparison of the original size, in green, and the larger size, in white. I've got the white one sitting on a shelf while I process what I learned from the experiment. I know I'm not happy with it as is. The flaws, in addition to the wings, are that the head is tilted down too much, and I somehow managed to sew the ears misaligned. The ears are operator error. The head tilt, I'm not sure what happened. I also think the legs at the larger size can use more definition. What do you think?
Until next time...
The first problem I ran across was that the wings with 2 layers of felt at the small size, did not translate well to the larger size. The wings weren't stiff enough to stand up. I cut out 3 layers of felt for each wing. The wing is better. It's certainly stiffer. However, the wings are too heavy for the rest of the dragon.
The picture to the left shows the comparison of the original size, in green, and the larger size, in white. I've got the white one sitting on a shelf while I process what I learned from the experiment. I know I'm not happy with it as is. The flaws, in addition to the wings, are that the head is tilted down too much, and I somehow managed to sew the ears misaligned. The ears are operator error. The head tilt, I'm not sure what happened. I also think the legs at the larger size can use more definition. What do you think?
Until next time...
Saturday, August 3, 2013
Teeny tiny
Missed yesterday because I had family visiting. So, now, onto what's been happening this week. I've been trying to come up with a tiny doll the size of the bendy dolls to be in compliance with the toy law and utilizing only natural materials. My natural materials of choice being wool felt, and cotton embroidery floss. I've had a series of failures, but finally something resembling a success.
The doll is photographed against a 1 inch grid on a cutting board. Of course this is just a bare doll, not even a wig for hair. However, the experiment may stop here.
While visiting with family, I showed them this doll. There were exclamations of wonder at how tiny it was. But, also, everyone agreed, it was too small. And, they are correct. The doll is so small that a child would lose it easily. In addition, a medium to large pet might swallow it whole.
This caused me to pause for a bit. I've been thinking about what was said, and about potential customers commenting to a child who wanted one of my very small toys, that they would just lose the toy and it was a no. To that end, I am looking to make things a bit larger. I'd like the dolls to be a size that can ride on the animals I make. That means not only designing a new doll from scratch, but enlarging the critters. My concern is, as I enlarge the patterns, what is now cute at 4 inches will look primitive and lacking at a larger size. The only way to tell is to try it and see.
What is your opinion on the size of the toys I'm making?
Until next time...
The doll is photographed against a 1 inch grid on a cutting board. Of course this is just a bare doll, not even a wig for hair. However, the experiment may stop here.
While visiting with family, I showed them this doll. There were exclamations of wonder at how tiny it was. But, also, everyone agreed, it was too small. And, they are correct. The doll is so small that a child would lose it easily. In addition, a medium to large pet might swallow it whole.
This caused me to pause for a bit. I've been thinking about what was said, and about potential customers commenting to a child who wanted one of my very small toys, that they would just lose the toy and it was a no. To that end, I am looking to make things a bit larger. I'd like the dolls to be a size that can ride on the animals I make. That means not only designing a new doll from scratch, but enlarging the critters. My concern is, as I enlarge the patterns, what is now cute at 4 inches will look primitive and lacking at a larger size. The only way to tell is to try it and see.
What is your opinion on the size of the toys I'm making?
Until next time...
Friday, July 26, 2013
Unicorns are here
I finally figured out how to put together a decent horn for a unicorn. I got a few of them made and they are now in my Etsy store. I've also added a few dragons and another Nessie. I got a wonderful idea for some witch and wizard dolls. I'm working on those this week along with some paperwork I have to catch up on. Over all it's been fun the last week. I finally feel like I'm back in my groove. I just love my studio space for creating. I think it's working very well.
I've started adding inspiration to my bulletin board above the desk. One of the images is the word "play". When I'm in the studio, it does feel like playing. In fact I feel rather guilty that I am playing and not working. Even tho' this is now my work. I have always heard the saying about doing what you love and you'll never work a day in your life. I always thought that was a bit unrealistic. And, to be fair, it is. After all, just because one has found joy and yes, play, in their work doesn't mean that you don't have to deal with mundane stuff. There are always chores that have to be done, that don't appeal. However, I'm finding that when I'm really involved in creating something in my studio space, I still need to take breaks. When I take that break, I'm perfectly willing to do a bit of the mundane stuff before coming back to play. I'm really thinking that play is an essential part of being human.
Until next time...
Friday, July 19, 2013
West wind
Finally feeling like I'm getting back into the swing of working again this last week. Seemed like the last 6 weeks were not very productive on the toy end of things. Tho' I did make a lot of candy, do the craft show, and prior to that went to a wedding.The fellow pictured to the left is the newest Pegasus. His name is Seferino, it means "west wind". This is the first time I've not used beads for eyes. I embroidered the eyes so it's a safer toy. The Pegasus is made of 100% wool felt, wool stuffing and cotton embroidery floss. I think it turned out rather well. I've got several unicorns and a dragon in process in the studio. They will all be created using the same materials. I liked the beads for eyes because it had that shine factor. But, as I mentioned, these are safer.
I've been thinking more about "play". It's amazing how much of play is hard wired into us. And, not just us, but other mammals too. Cats, dogs, bears and dolphins all play. The professionals will tell you that the animals are practicing their survival skills when they play. Thinking about that, since we are mammals too, wouldn't that make playing on our part a survival skill also? But, where a cat is practicing attacking prey, what is it we are practicing? If you look at playing team games, it makes sense. Humans need each other, to be able to work together for a common goal, in order to survive. But what about other things that we play? Card games, board games, musical instruments or even video games. How do they add to our survival? Something to think about.
Until next time...
Friday, July 12, 2013
Showtime
To start today, I realized about mid-week last week, that I didn't post last Friday. Things happen.
The picture today is from the Art in the Park craft show I was at on July 4th. I've been wanting to see the castle used as I imagined back in January when I started painting it.
It was a success. It drew people's attention. The children loved it and dragged parents or grandparents over to see it. The critters and dolls were well loved. I really didn't expect to sell many toys at this show. And, I only sold one dragon. But, come time for Christmas shows, I'm sure there will be sales. One little boy was so cute. He very seriously asked me if I played with the castle and the toys. I didn't have the heart to tell him I didn't play with them. And I guess technically, I did "play" with them when I was arranging the display. (And re-arranged the display after others played with them. *smile*)
I've been noticing lately how I use the word "play" in my everyday language. I refer to gardening as "playing in the dirt". I play my flute. When I get tense when learning how to draw and paint, hubby reminds me that I'm playing with the colors. It does put a more relaxing spin on things. I even realized that I refer to my sewing of the toys as playing with thread. Talking with my son the other day, I was reminded that back when he was in high school I would advise him to "play the game" of class work as a way to motivate him to do his homework and to keep up his attendance. Another common phrase, though I don't use it much, is "playing the game of life".
This has led me to give some thought as to what "play" really means. The word implies fun and games and children. Yet, as adults we still refer to things we enjoy as play. We also try to psych ourselves up by referring to work, life and school as play. Playing seems to be serious business.
Until next time...
The picture today is from the Art in the Park craft show I was at on July 4th. I've been wanting to see the castle used as I imagined back in January when I started painting it.
It was a success. It drew people's attention. The children loved it and dragged parents or grandparents over to see it. The critters and dolls were well loved. I really didn't expect to sell many toys at this show. And, I only sold one dragon. But, come time for Christmas shows, I'm sure there will be sales. One little boy was so cute. He very seriously asked me if I played with the castle and the toys. I didn't have the heart to tell him I didn't play with them. And I guess technically, I did "play" with them when I was arranging the display. (And re-arranged the display after others played with them. *smile*)
I've been noticing lately how I use the word "play" in my everyday language. I refer to gardening as "playing in the dirt". I play my flute. When I get tense when learning how to draw and paint, hubby reminds me that I'm playing with the colors. It does put a more relaxing spin on things. I even realized that I refer to my sewing of the toys as playing with thread. Talking with my son the other day, I was reminded that back when he was in high school I would advise him to "play the game" of class work as a way to motivate him to do his homework and to keep up his attendance. Another common phrase, though I don't use it much, is "playing the game of life".
This has led me to give some thought as to what "play" really means. The word implies fun and games and children. Yet, as adults we still refer to things we enjoy as play. We also try to psych ourselves up by referring to work, life and school as play. Playing seems to be serious business.
Until next time...
Saturday, June 29, 2013
The final drawers
Last week I shared with you how I made version 1 of a small parts cabinet for my desk. And, I shared how I wasn't happy with it. I proceeded to make version 2 out of book board. Let's just say, that was a failure. Not to be seen again by mortal eyes.
I resigned myself to seeing if I could find a small enough parts cabinet in the hardware store. I really wasn't happy with the metal and plastic sitting on my wood desk. Then I got the idea for version 3. I worked out the dimensions and cut into book board. I was able to create a 9 drawer cabinet that held the drawers I made previously for version 1.
It's not perfect. It does function. The drawer knobs are 10mm wood beads that I attached with perl cotton. In order to keep them from pulling out over time, I reinforced the drawer where I tied the thread.
Looking back, I'm thinking maybe I should have painted the beads blue or white to go with the rest of the cabinet. I was so jazzed that it was coming together, I just used them as they were.

Here's a view with a few drawers pulled open.
Now, onto the next project. I'm struggling with the actualization of a round vision/bulletin board. I bought a large quilting hoop to be the frame of the board and intended that it be covered with cloth. The hard part is filling the cavity behind the cloth so I can pin things to the board. There isn't cork board thick enough on it's own. (And, even if there was, it's hard enough cutting cork board 1/2 the thickness.) More on that later when I reveal it completed.
I've been doing some thinking about why I'm not making more progress getting things done in my studio and making the toys. I've also been thinking about the fact that I have fallen off my resolve to have an actual work week. I had an epiphany this last week. I'm not getting to what I want because I consider it play time. I was raised that you don't "play" until your work is done, all of your work is done. That led me to take a serious look at what playing is and how it fits into our lives at all ages. I'll be continuing on this topic in the future. For now, I will leave you with this quote.
American writer
1803–1882
Until next time...
I resigned myself to seeing if I could find a small enough parts cabinet in the hardware store. I really wasn't happy with the metal and plastic sitting on my wood desk. Then I got the idea for version 3. I worked out the dimensions and cut into book board. I was able to create a 9 drawer cabinet that held the drawers I made previously for version 1.
It's not perfect. It does function. The drawer knobs are 10mm wood beads that I attached with perl cotton. In order to keep them from pulling out over time, I reinforced the drawer where I tied the thread.
Looking back, I'm thinking maybe I should have painted the beads blue or white to go with the rest of the cabinet. I was so jazzed that it was coming together, I just used them as they were.

Here's a view with a few drawers pulled open.
Now, onto the next project. I'm struggling with the actualization of a round vision/bulletin board. I bought a large quilting hoop to be the frame of the board and intended that it be covered with cloth. The hard part is filling the cavity behind the cloth so I can pin things to the board. There isn't cork board thick enough on it's own. (And, even if there was, it's hard enough cutting cork board 1/2 the thickness.) More on that later when I reveal it completed.
I've been doing some thinking about why I'm not making more progress getting things done in my studio and making the toys. I've also been thinking about the fact that I have fallen off my resolve to have an actual work week. I had an epiphany this last week. I'm not getting to what I want because I consider it play time. I was raised that you don't "play" until your work is done, all of your work is done. That led me to take a serious look at what playing is and how it fits into our lives at all ages. I'll be continuing on this topic in the future. For now, I will leave you with this quote.
It is a happy talent to know how to play.
Ralph Waldo EmersonAmerican writer
1803–1882
Until next time...
Friday, June 21, 2013
Parts drawers out of cardboard
To the right you can see the finished parts drawers. I am not happy with this. The drawers are the correct size. But, the sleeves ended up being less precise and the whole became a little wonky. But, as I said I'd share the instructions, I will do so. I'm also re-making this another way. Another note, I need some sort of drawer pull on the drawers. Right now, I'm catching the top with a fingernail and pulling. In addition, I have to hang onto the whole thing because some of the drawers are a little tight. If you want to try this yourself, you may want to play with opening up the sleeve part some to ease the drawer sliding in and out. I did not make changes to the directions, because I am abandoning this way of doing things and am trying a different design.

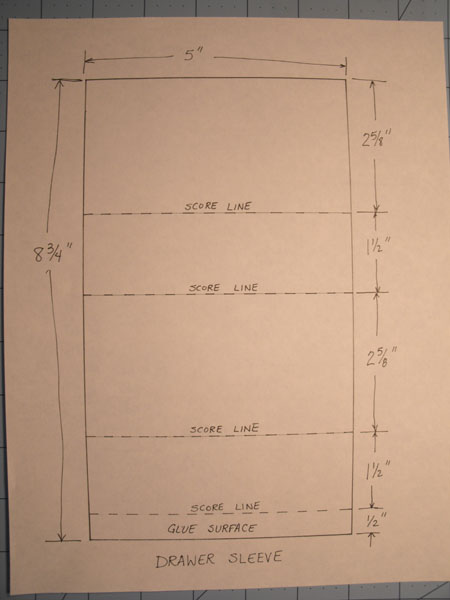
These are the dimensions I used to make each drawer and sleeve. With the cardboard I was using, I scored the sleeve on the outside of the box when it was folded up. It worked easier.
This is how the drawer is folded. I used white glue on each small tab and held it for several seconds to make sure it stayed before moving on to the next.
Below is how I folded the sleeve. I used white glue along the small tab and made sure the edge of the top was flush with the side. Again, holding for several seconds to insure it would stay and not fall apart.
Once I had 9 sleeves and 9 drawers, I assembled the sleeves together with white glue. This is where I discovered that I hadn't been as precise as I thought. Some sleeves were not rectangles but parallelograms. Some were slightly smaller or larger. I was determined and glued the sides and tops together anyway to create a 3x3 grid of sleeves. The picture below shows single layers of sleeves glued to each other before gluing the rows together.
Once everything was dry, I started installing drawers into sleeves. It sort of worked. Some drawers slide fine. Others are a very snug fit. I tried changing drawers around in different sleeves to get the best fit. It wasn't as successful as I would have liked. I have a new idea that will give the whole a little more substance. I may be that a small grid of sleeves would have been better. Even just a little 2 drawer set may be perfect. I really wanted the 9 drawers.

I'm going to attempt to create a "cabinet" out of book board to replace the sleeves and keep the drawers as is. I also plan on adding drawer pulls somehow so I can actually pull a drawer open rather than wrestling with them. I'll keep you posted.
Until next time...
Friday, May 31, 2013
Custom drawers
This is what's in the studio right now. I'm trying to streamline my workspace. I wanted little drawers as storage for the small parts I use to create the dolls and critters.
The ready made plastic ones I could find were not going to work for me. They had snap lids, or the drawers were too small, or the drawers were to big. None of them fit nicely in the corner under the riser like I wanted.
So, what's a creative person to do? Make it themselves, of course. LOL I had some .03 inch thick book board and no particular project for it. I've used 90% of what I had making these. It's not done by a long shot. I have to finish gluing the drawer sleeves into a box. Then, in order to stabilize the structure, I'll be creating a box with thicker book board around the sleeves. I still have to figure out what to use for drawer pulls. But, this, when done, will give me more space than I currently need for storing small things and fit under the riser over in the corner. Accessible, but out of the way.
I am taking pictures of each step along the way. When complete, I will post a tutorial on how to do this yourself, if you'd like. In the meantime, I will be taking next Friday off from posting. I will be involved in a wedding next weekend and will not be able to post. But, I will be back the following Friday with something new.
Until next time...
The ready made plastic ones I could find were not going to work for me. They had snap lids, or the drawers were too small, or the drawers were to big. None of them fit nicely in the corner under the riser like I wanted.
So, what's a creative person to do? Make it themselves, of course. LOL I had some .03 inch thick book board and no particular project for it. I've used 90% of what I had making these. It's not done by a long shot. I have to finish gluing the drawer sleeves into a box. Then, in order to stabilize the structure, I'll be creating a box with thicker book board around the sleeves. I still have to figure out what to use for drawer pulls. But, this, when done, will give me more space than I currently need for storing small things and fit under the riser over in the corner. Accessible, but out of the way.
I am taking pictures of each step along the way. When complete, I will post a tutorial on how to do this yourself, if you'd like. In the meantime, I will be taking next Friday off from posting. I will be involved in a wedding next weekend and will not be able to post. But, I will be back the following Friday with something new.
Until next time...
Friday, May 24, 2013
Little boxes
I've been working on boxes this week. I've also been attempting to learn about using FaceBook, Twitter and Pinterest. Feel free to "like" my stuff. :)
The first box I made was to hold the long pipe cleaners I use when making the bendy dolls. I'm working on eliminating the big (as in taking up space on the desktop) 3 drawer box that my doll making supplies are in. It's still a work in progress.
And, of course, the photo came out blue. (Sorry about that.) I guess I need to add that to my list. Learn to take better pictures.
I was able to get my new business card designed and printed out. That made me happy. Especially since I've been listing stuff in my Etsy store. What if someone actually buys one of them? :D Anyway, with spiffy new business cards, they needed a new home. I applied my cool new box making skills to make a container.

It's a miniature clam-shell box. I was quite pleased how it turned out. It holds 20 business cards. The only problem is, will it stay closed when I toss it in a purse or bag? I'll keep you posted. And, I will gratefully accept any cool ideas.
Until next time...
The first box I made was to hold the long pipe cleaners I use when making the bendy dolls. I'm working on eliminating the big (as in taking up space on the desktop) 3 drawer box that my doll making supplies are in. It's still a work in progress.
And, of course, the photo came out blue. (Sorry about that.) I guess I need to add that to my list. Learn to take better pictures.
I was able to get my new business card designed and printed out. That made me happy. Especially since I've been listing stuff in my Etsy store. What if someone actually buys one of them? :D Anyway, with spiffy new business cards, they needed a new home. I applied my cool new box making skills to make a container.

It's a miniature clam-shell box. I was quite pleased how it turned out. It holds 20 business cards. The only problem is, will it stay closed when I toss it in a purse or bag? I'll keep you posted. And, I will gratefully accept any cool ideas.
Until next time...
Subscribe to:
Posts (Atom)